Browsed by
Category: Gardening

General gardening tips and hints

Tips on Making A Compost Heap.
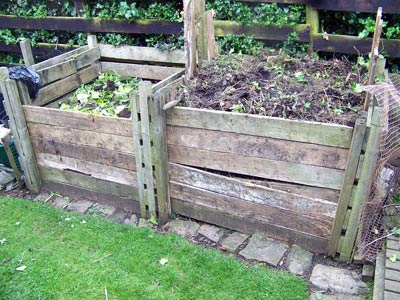
Tips on Making A Compost Heap.

Compost heap

A compost heap is an excellent way of recycling dead plant material and generating the best possible soil fertiliser. A good compost heap also gives a feeling of satisfaction because it helps the gardener to become part of the natural cycle of growth, decay and regeneration. Using a compost heap will also save many unnecessary trips to the local tip. See also: Benefits of Composting

How To Make a Good Compost Heap

The Compost Bin A compost bin should be about 1 square metre. It is important to have a good size, but, it should also be compact because otherwise the generated heat will be dissipated. It is also best to have at least two bins. This enables one heap to rot down, whilst the other is added to. A compost heap should also be aerated and enable water to enter. If you have an enclosed plastic bin, make sure you water where necessary.

Positioning. A compost heap can be really be put anywhere; most people want to choose a spot that is not too prominent. However, if it receives direct sunlight the process of decomposition will be faster.

Base Layer.
At the bottom of a compost heap it is good to use some twiggy material to make sure there is good drainage; if you have a heavy clay soil, you might want to add some grit to provide good drainage. If a compost heap becomes waterlogged, the process of decomposition will slow down and it will become slimy.

Mixing Layers. The next important strategy is to provide a good mix of material when building up a compost heap. For example, grass is a high source of nitrogen and can break down quickly to generate heat. However, grass needs to be mixed with other more woody material, otherwise it will not rot down properly. Similarly on their own stems and twigs will take a long time to rot down unless they have an activator like grass or over very green material. When adding grass clippings spread them out to form a thin, equal layer; then add a layer of more twiggy material. If necessary store a potential layer for adding at the right time.

Breaking Up Twiggy Material. Thick stems will take a long time to break down. If you have a shredder, it will make the job of composting a lot more successful. It will break down the material and enable much faster composting. If you don’t have a shredder, you can just squash the stems or break them in a few places. A rather crude, but effective, tip is to get a spade and hit down on the top of the heap to break a few stems. Even this small step will help quite a lot; what you are doing is to increase the surface area, enabling faster decomposition.

Water. As mentioned before, water is important. It is important to water a compost heap a bit like watering a plant. If there is no water, the compost heap will dry out and will not decompose. If it is waterlogged it will stagnate. Most compost heaps suffer from being dry, so every now and then throw on some water to speed up the process of decomposition.

Cover. When the compost heap is finished with adequate amounts of water, it is good to cover with a plastic coating. This enable the heap to generate more heat, speeding up the process of decomposition; it also prevents excess water.

Aerate. In hot weather when a compost heap is generating a lot of heat it is a good idea to get a garden cane and poke the heap, every now and then. This allows air to enter and expedites the process of aerobic decomposition. A good heap will have steam coming from it when you aerate it.

Read More Read More

Sweet William Organic Seeds

Sweet William Organic Seeds

In addition to collecting my own seed I like to try new varieties.
Suttons seeds have a ‘Kaleidoscope mix that I have just bought as an experiment. They were half price in the Wyvale sale and look as though the flower heads will feature white and a range of other pastel colours.

Cottage garden favourites are now running to seed in my garden. I am glad I dead headed the plants earlier and got a second flush of flowers but now is the time to collect seed.

Sweet William Seed.

  • Each pollinated floret will generate seed which is held in a firm upright cup.
  • As the seed dries and gets ready for distribution the cup opens and the black ‘gritty’ seeds can be shaken out. I use old envelopes to collect the seed into so I can keep and name different seeds.
  • If only a proportion of the seed capsules are open gently shake the plant into your container. If the majority are open I cut the head off, invert it over some paper and gently shake and squeeze to extract the seed.
  • Sweet Williams are quite promiscuous so do not always grow just like the parent you collected from. They will have many of the characteristics so select from the colours you like. The red flowered, red leaved types are my favourite but you may prefer the pastel or chocolate kinds.
  • Nature knows what it is doing and the seeds can be sown now to germinate and grow before the ground gets too cold. If you want an informal effect you can just shake your seedheads over a soil patch and wait.
  • Other members of the Dianthus family such as Pinks and carnations can be treated in the same way

The seed I collect will be organic as I have not used any chemicals for the last two years on or around my Sweet Williams. However they will not be certified by the soil association but in the scheme of things that wont matter.

Sowing & Growing Tips
As I have just bought the seeds I am sowing them to overwinter and flower next year.
If sown in February or March they should flower the same year.
They like a bit of space to excel so allow 6-9 inches apart when planting out in the final sunny positions.

Ride on Mower Tips

Ride on Mower Tips

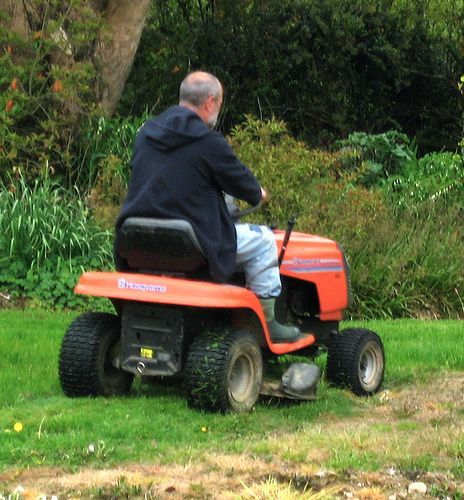
Sit back and enjoy cutting your grass.

husquvanna

So your grass covers too much area for your small mower and you want to ride in style whilst you cut the lawn, then a ‘ride on mower’ may be what you need.

Ride On Mower Tips

  • Do you plan to cut & collect the grass or just have built in mulching that then distributes it back onto the grass. I would go for one of the hybrids so you can collect long grass at the beginning of the season then turn on mulching to reduce the trips to the compost heap.
  • Ride on mowers are available from Argos at below £1,000, better mowers can be good value around £4,000 but larger more professional models go up to £10,000+. Equate your budget to the amount of work to be done – you don’t need a sledge hammer to crack a nut nor should you send a boy to do a man’s job (these metaphors need mulching).
  • From the large variety of models available make sure you can mount the machine, drive in comfort and feel safe.
  • You can save money buying secondhand. Try retailers who have a good trade in policy and a large throughput.

What you get for your Money

Read More Read More

Taking Cuttings for Beginners

Taking Cuttings for Beginners

gera

Rooting cuttings of your favourite plants can help you get more plants for free. Here are some simple tips for beginners to get you started.
If in doubt I push odd cuttings into soil in a corner and hope. It is surprising what will root and grow.

Types of Cutting

  • Soft wood cuttings are made from new shoots and tips that are soft and tender in spring. Dahlias, Chrysanthemums, Penstemon, Fuchsia, and Aubretia can be rooted this way
  • Semi-ripe cuttings are taken mainly in summer when the young shoots have just started to turn brown and harden at the base. Pelargoniums, Forsythia, flowering currant Escallonia are just some plants that will root with this method
  • Hard wood cuttings taken in autumn will take a bit longer to root but are used for roses, dogwood, black currants and many shrubs

General Tips

  • The day before taking cuttings give the host plant a good watering.
  • Choose strong healthy stems. Keep in a plastic bag whilst you collect other cuttings so they do not dry out.
  • Remove the lower leaves and trim to just below a leaf joint.
  • Place cuttings in a pot of cutting compost or soil with some sharp sand added.
  • Keep humid and add bottom heat where possible.
  • Adding grit to compost can stimulate roots

Tips for Soft Fleshed Plants eg. Pinks, Penstemon & Geraniums

  • When cuttings are rooted pinch out the growing tip to get a bushy plant.
  • Keep cuttings out of direct sunlight.
  • Cuttings should  be taken in spring and summer.
  • Cuttings should be 2″-5″ long depending on variety and available material.

Tips for Taking Hardwood Cuttings of Trees and Shrubs

  • Cuttings taken between July and October for semi-hardwood cuttings, and between September and March for hardwood cuttings produce the best results.
  • Cuttings take between two to twelve months to root well.
  • Hardy plants should be rooted in containers outdoors or in cold greenhouses.
  • Select  mature sections from the current growth at the base of the stem without  flowers, fruit or seed heads.
  • Cuttings can be 5-15″ long with at least two leaf joints attached.
  • How to take cuttings for big shrubs

Beginners Cutting Tips

  • These general tips are about stem cuttings but you can also take cuttings from leaves, roots, and buds for some plants. Check links to specific plants for special requirements. You can root some plants by placing the bottom of the cutting in water.
  • You can use a rooting hormone to encourage cuttings but I don’t and have tended to take more cuttings to compensate for failures.
  • A heated propagator will be useful if you intend taking a lot of cuttings.
  • Take enough cuttings so you do not have to worry if many of them fail to root. (But I bet you surprise yourself.)

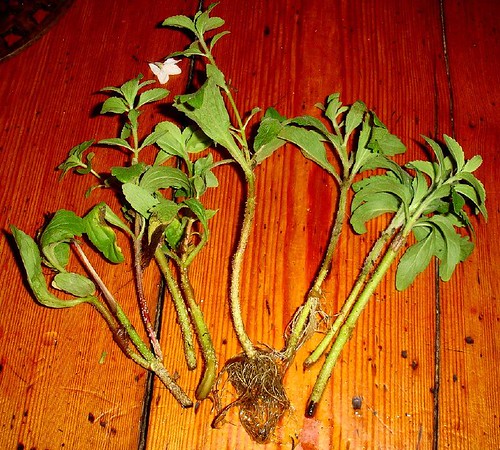
Stevia cuttings after 18 days in water : bouturage de stevia après 18 jours

Credits
Gooseberry cuttings by net_efekt CC BY-NC 2.0
Stevia cuttings after 18 days in water : bouturage de stevia après 18 jours by hardworkinghippy CC BY-SA 2.0

Worms for Gardeners

Worms for Gardeners

Book Cover

We all know worms are good for soil and they are an important part of the natural life cycle in your garden.
They help recycle fallen plant matter and excrete fertile worm casts.
Worms help air get into the soil.
Worms can help break up clay soil.
How often do we care for our worms?

What Kills Worms

  • Worms can drown in waterlogged soil.
  • Worms can die from drought in sandy soil.
  • ultraviolet light, lack of moisture, extreme acid or alkaline conditions.
  • Lack of food , lack of air and bad  drainage.
  • Some pesticides, chemical fertilizers, household cleaners and chemicals including detergents.
  • Birds, red spider mites, mole and other critters.

With that list it is surprising we have any worms at all. Still now you know what to avoid. For more help read Lorene Nancarrows book.

Wild Garden Must Haves

Wild Garden Must Haves

If worms live a a wormery where do bugs live?

RSPB Wildlife Stack
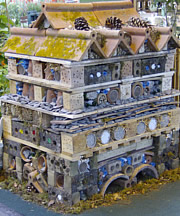
If you want a haven for wild life in your garden Mick Lavelle has ten ‘must haves’ for you to incorporate. This picture of a wildlife palace from the RSPB archive shows how to create food for birds by protecting insects – see construction details below.

Wildlife Shelters

  1. Log piles mimic fallen trees and provide shelter for wood boring beetles insects and amphibians.
  2. Hedgehogs need shelter in daytime and for hibernation. A Habitat stack can provide these if you create a mixed environment with a wood pallet basement followed by a brick pile and layers of tiles, rubble, twigs and logs.
  3. Leaf piles are usually rich in overwintering insects and form a loose structure for lots of wildlife.
  4. Bee and Bumblebee boxes can be as simple as bundles of open ended garden canes to provide a resting spot for Bees.
  5. Rock piles provide nooks and crannies for shelter and security. A mixed herediment will offer the best overall shelter with a bit of everything for lots of creatures

Wildlife Feeding Environments

  1. Wildflowers and grasses provide seeds as food and ‘escape cover’ for amphibians moving from a pond.
  2. Bird feeders are more commonplace than ever but make sure they are filled with appropriate food and kept clean.
  3. A clump of nettles provides food for leaf eating caterpillars and nectar for other insects.
  4. A pond should be at least 18 inches deep to prevent over heating. It provides drink, food and a living space.
  5. If space permits a bog garden of wet mud will be a habitat for invertebrates and provide mud for nesting swallows and swifts

Gardeners’ World”: 101 Ideas for a Wildlife-friendly Garden

Read More Read More

Killing Slugs with Kindness

Killing Slugs with Kindness

I grow slug food, not deliberately but that seems to be the fate of my Hostas. Now is a time to kill off the juveniles slugs before they start laying eggs for overwintering and I am considering organic nematodes that you just water in. Mix up a paste in a watering can, water in and young slugs will be killed in a matter of days.

Buy ‘Natural organic control’ slug killer for less than £10 or for a large pack at £17.95from Amazon

Help other natural predators particularly birds, hedgehogs and frogs to eat your slugs and their eggs. Keep the soil loose and tidy up dead organic material but provide safe havens for the predators. Nemaslug is harmless to children, pets and wild life only killing slugs.

It may be too late for this years Hostas which are now a ‘harvest festival for slugs’ but I shall have revenge.

Clematis as slug food

Do not feed your slugs and snails on your Clematis

Even in this wet summer there are better plants for them to snack on

Try the inverted grapefruit skin as I prefer to drink beer not drown slugs

Sweet Pea Problems and Cures

Sweet Pea Problems and Cures

Sweet peas are not difficult to grow but they can be difficult to grow well.
Sweet Pea

Basic Problems with Sweet Peas

  • Leggy seedlings are caused by high temperatures of insufficient light. Move to cooler, brighter locations.
  • Powdery mildew and yellow mottling on leaves is caused by viruses. Control with a fungicide like Systhane.
  • Aphids can be controlled by an insecticide.
  • Scorched foliage can be caused by drought or temperature stress.

Read More Read More

Garden Control of Invasive Weeds

Garden Control of Invasive Weeds

Do not let the little blighters get a foot (or root) hold in your garden. Gardeners need to be on their guard when it comes to controlling pernicious weeds as little plants invade quicker than you imagine.

Top Ten Invasive & Pernicious Weeds

  1. Japanese Knotweed is a big thug – a really big thug! Beware!
  2. Convolvulus or bindweed (above)that grows as a twining climber and throttles the host.
  3. Mares (or horses) Tail a plant from the age of fossils, it is so hard to destroy once you have a colony.
  4. Giant Hogweed Heracleum mantegazzianum is covered by legislation and quite dangerous due to the burning effect of the sap.
  5. Rosebay Willow Herb once more feared than is now the case see picture below.
  6. Himilayan Balsam the new plant we love to hate, introduced by Kew gardens in the 1830’s. link
  7. Thistles of all sorts and varieties if not selected by the gardener
  8. Brambles particularly the hedgerow varieties with very small fruit and thus no redeeming features.
  9. Aquatic weeds named by RHS as invasive including New Zealand pygmy weed (Crassula helmsii) and Parrot’s Feather Myriophyllum aquaticum, Fairy fern, Floating pennywort , Nuttall’s pondweed, Curly waterweed and Curled pondweed
  10. Take your pick from Dandelion, Nettle, Buttercup any plant growing anywhere you didn’t want it to grow. Let us know your view

Rosebay-Willow Herb in flower and seed.

Tips for Controlling Invasive Weeds

  • Prevention is better than cure. Do not let them seed
  • Do not take plants or soil from the wild and take care with seed.
  • Dig up at the first sign of growth.Dig out all the root and I mean all!
  • Do not compost flowers which may contain seeds nor roots.
  • Cutting down or digging up weeds and burning the waste plant material are useful, low-tech means of control.
  • Pulling up Himalayan balsam before the plants flower is the most effective method of control. Cutting plants down before they flower can result in a more bushy plant that produces even more flowers. Young growth may be more susceptible  to weed killers.
  • Spraying invasive weeds with herbicide is the most effective form of treatment currently available. It can however take several years to get rid of some invasive species.The effectiveness depends on the type of herbicide used.
  • Apply sodium chlorate crystals to the hollow cut stems after cutting back is said to be effective. But be careful as sodium chlorate is highly soluble and any spillage can affect nearby plants.
  • Impermeable membranes like black plastic work on most plants by denying light and water. Unfortunately Japanese Hogweed can push through the toughest barrier.

Let us know if you have a fool proof method  – this fool needs all the help he can get!

Below Japanese Knot Weed in a clump and a thistle ready with seeds.

Weedkillers

Book Cover

Roundup Weedkiller concentrate

Book Cover

Handy spray gun,

Himalayan balsam is enemy number one at Otley Chevin where this invasive weed is chocking our natural flora. Locals have been recruited to help with ‘Root it Out’ events to stop the spread of these seed propagated plants.
I have has seedlings in my garden as has my badminton partner but fortunately they are easy to up root if you get them before they seed.

Recognising Himalayan Balsam

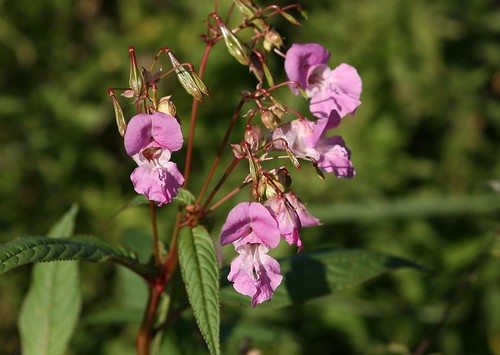
  • Himalayan Balsam is common on river banks with reddish coloured stems and dark green lance shaped leaves with jagged edges.
  • The brightly coloured flowers that are usually in variable shades of purplish-pink from June to October up to 6 feet in height.
  • The plant is annual and lasts for one year and dies at the end of the growing season.
  • Himalayan Balsam can produce around 2,500 seeds in explosive seed pods that throw seeds over 20 feet away from the original plant. The seeds can last in the ground for several years.

Himalayan Balsam
Treatments to Kill Himalayan Balsam

  • Do not allow invasive weeds to set seed.
  • Pull out the shallow rooted plants as soon as you see them.
  • Cut off below the last node near the ground and they shouldn’t regrow.
  • Animals can safely graze on the plants.
  • Himalayan Balsam should be sprayed in spring before flowering with Gylphosphate based weed killer

Book Cover Book Cover

Sprayer and Weedol by Amazon

Photo Credits
Himalayan Balsam by Deanster1983 CC BY-ND 2.0

Why do they grow ‘Shamrocks’ in Ireland?

Because St Patrick took all the ‘real rocks’ away so the snakes couldn’t hide.

Growing Pinks for Cottage Gardens

Growing Pinks for Cottage Gardens

Pinks are ‘divine flowers’ that can be planted in late April / May or October and produce a continuous supply of flowers suitable for cutting or exhibiting. They are perennials that are at their best for 2-3 summers. Scent, colour and uniformity are just 3 reasons for growing Pinks or other varieties of Dianthus.

Cultivation of Pinks
Pinks are completely trouble free if planted in a sunny position, in free draining soil. (asking for trouble there)
Occasionally water like any other garden plant and dead head after flowering.
Pinks bloom from early spring until the first frosts.
Hardy Pinks don’t mind the cold, so no need to lift them over the cold winter months.
Pinks will be a talking point in winter due to their silver/grey leaves .
Each spring tidy up around the plants and work in a fertilizer like Growmore, dried blood or Superphosphate

Read More Read More