Browsed by
Month: February 2010

Crocus Planting Depth

Crocus Planting Depth

crocus

These crocus photos were taken at St Johns College, Oxford. Raindrops add a bit of interest though it is tempting to wipe the mud off.

Best Planting depth

  • Plant the corms about 4 inches deep, with the wider bottom of the bulb at the bottom.
  • Plant Bulbs about 3 to 4 inches apart.
  • For best effect plant in drifts and mass plantings of at least a dozen.
  • When Planting crocus, the best time is September or early October.

crocus

This same bunch of crocus has just been taken from a higher angle.

Notice how it gives quite a different effect to take photo from ground level.

crocus

Crocus In bloom.

crocus

An uncollected leaf adds a touch of colour.

Read Crocus Tommasinianus

Small is Beautiful in Gardening with Conifers

Small is Beautiful in Gardening with Conifers

‘Do not forget to pause and smell the flowers’ is an injunction oft repeated but it could also apply to pausing to inspect the flowers. It is easy to see the brash flowers of Dahlias, Peonies of Delphiniums for instance but close inspection of the petal-pattern or the individual florets can open up a new view of gardening.

One flower that fascinates me is the Cyclamen with the nodding head that straightens to a twist of petals what slowly untwist to reflex the petals back towards the stem. A fascinating natural process to observe. Look out for other dwarf bulbs including Crocus chrysanthus, Eranthis hyemalis (yellow aconite), Oxalis and Grape Hyacinth.

For structure in a miniature garden you can do a lot worse than Dwarf Conifers but be wary of slow growers that will eventually dominate like Juniper horizontalis and Chamaecyparis lawsoniana ‘Ellwoods Gold’.

Dwarf Conifers under 18″

  • Juniper communis Compressa is recognised as one of the best conifers for creating a miniature landscape with its slender spire of tightly packed grey-green foliage.
  • Abies balsamea Hudsonia grows to 12″
  • Chamaecyparis lawsoniana ‘Minima Aurea’ has wonderful golden foliage in a dense conical bush. Chamaecyparis lawsoniana Pygmaea Argenta also tops out at a similar 24″ but is blueish green with creamy white tipped shoots.
  • Juniper squamata Blue Star is a spreading 10″ high contrast to yellow leaved conifers.
  • Thuja occidentalis Danica is a neat bush with bronzed winter tints.

It pays to think small and to look closely. If you are limited for space it may pay to create a garden in miniature selecting all the small species you would like to see in Acres of space.

Cottage Garden for Edible Crops

Cottage Garden for Edible Crops

The traditional Cottage Garden was a working garden for the growing ornamental and edible crops. Planting included fruit, vegetables and herbs mixed with flowers such as Peonies, Delphiniums and Aquilegia to produce a haven for insects, an eye opener for gardeners and crops for the house.

Cottage Fruit Garden

  • Rhubarb would be one of my key plants in any cottage garden. In addition to the fruit pies from the pink and red stalks I would allow some plants to throw up the striking flower stalk. The Sutton or Victoria from Thompson Morgan would be appropriate varieties.
  • Gooseberries remind me of grandparents garden and Lancer is a green mid season fruit that crops well. Whinham’s Industry is a neat red.
  • Raspberries like Malling Jewel with some wire support near a wall or strung from two stout posts would also go into the cottage fruit patch.
  • Currants smell so good when the leaves are slightly crushed and redcurrant  Red Lake and the blackcurrant Wellington XXX would fill up the patch.
  • An old Apple tree in the corner may be supplemented by new ballerina columnar trained small trees.
  • If there is space for a Plum tree it will be an eating variety like Czar fan trained against a wall.

Cottage Vegetable Garden

  • Runner beans can hold there own amongst many flowers and I am growing Painted Lady variety this year.
  • French beans and broad beans are popular in my household so I will grow more of these than the brassicas which do not get eaten.
  • For colourful vegetables I will plant some Swiss Chard ‘ Bright Lights’.
  • I grow a mix of mangetout and garden peas that need regular picking.
  • You can also get away with a Tumbler tomato or two in a front garden.
  • Leeks look flamboyant when grown with  large flags and a good leafy marrow will provide lush green growth.

It is hard to agree on a range of flowers for a cottage garden so I have ducked the issue a bit. Nasturtiums are edible and cottagy and where would a garden be without Sweet Peas.

Swiss Chard
Growing Dried Flowers

Growing Dried Flowers

I guess when they are growing they are not dried flowers so the real title should be growing flowers for drying. As the display above shows you can get colour and texture into a bunch of dried flowers. The display is likely to last longer than a bouquet of fresh flowers and will be available when other material is expensive or in short supply.

There are 5 stages of development when a plant can produces flowers for drying.

  1. In bud as colour appears, examples being Helichrysum (Straw flowers) and Ammobium ( Everlasting flowers).
  2. As the buds open, with Echinops (Globe thistle), Eringium (Sea Holly), Lavender and Ornamental Grasses.
  3. In full bloom, with Achillea (Yarrow), Alchemilla mollis, Gypsophillia and Alliums (ornamental onions)
  4. After seeds have formed, like the Honesty in the bunch above and Antirrhinum, Poppy and Digitalis (Foxglove)
  5. Just before the seed pods open, but after spraying with hair lacquer to prevent seeds scattering, Nigella and Scripus ( Bulrush)

The best way to dry flowers is to pick them  in mid morning when the dew has evaporated.

  • Group them into small bunches and hang them upside down to dry.
  • To preserve the colours, hang them in a dry well ventilated space with little or low levels of light.
  • Large heads like Alliums and Artichokes need to be dried standing up. Make a chicken wire frame to separate and hold each bloom.
  • Read More Read More

Courgette & Marrow, Watering, Pollinating and Harvesting

Courgette & Marrow, Watering, Pollinating and Harvesting

Watering Marrows

  • Marrows are over 80% water and need plenty of watering when in full growth and the first fruits have set, at least 2 gallons per square yard per week or a gallon per plant per day.
  • Plant a cane or marker with the baby plant or seed so you know where the roots starts. Half bury an empty plant pot so you can pour water into it to get water directly to the roots.
  • Avoid splashing water on the stems of the young marrow plants.
  • You can apply a moist mulch of grass cuttings or compost after watering. This helps conserve soil moisture and keeps the weeds down.

Pollinating Marrows

  • If it is very cold, wet or windy while the plants are flowering then insect pollination is less likely to be successful.
  • Hand pollination is the best method in these circumstances and when growing under glass. Rremove the petals from a male flower; push the core into the centre of the female flower.
  • The female flowers are distinguished by the swelling below the bloom. Male flowers have a prominent phallus shaped central core, bearing yellow pollen. Male flowers may appear first but are regularly produced.

Harvesting Marrows

  • Ripe marrows have hardened skin and make a hollow sound when rapped with the knuckles.
  • Marrows mature quickly taking only two and a half months.
  • Young marrows may have been picked when very small, as courgettes but at the beginning of Autumn harvest all marrows leaving a long stalk on each. Do not wait until they have been frosted.
  • Store in nets suspended from a ceiling in a cool airy dry environment. They will keep for up to 6 months depending on variety.

Varieties to Grow

Read More Read More

Measuring Aids When Gardening

Measuring Aids When Gardening

Ranunculus  seguieri

Bodgers know about making use of the ordinary to help achieve results and here are a few tips for gardeners when measuring in the garden.

Your own body has natural measurement so check them out against a tape measure or ruler and remember the key ones. A stride is about 3 feet, a hand span from tip of thumb to tip of little finger is about 9″, an index finger 3″, heel to toe in a gardening boot 12″, arms akimbo 6 feet, hand width 4″ etc.

Home made measuring sticks can be created, from a 3 foot cane you have a yard stick, on a longer strip of wood paint a mark every foot or every 6″. On your garden rake or other tools paint sizes or lengths.

Buy your watering can with measures already marked or test the capacity with a kitchen jug and record the size with a permanent marker pen. Invaluable when mixing concentrated chemicals.

Buy a graduated dibber and trowel with marks every 2″ or make your own. Measure the depth of the blade on your spade.

Tie a known length of string to two pegs and stretch it out to get a straight edge of known length. If you are a sports field groundsman you may have a metal linked chain for your cricket pitch which will be 22 feet or ‘one chain’ long.

Areas are harder to measure but 4 by 3 foot canes in a square equals a square yard and this can be useful for spreading dry fertilizer and lawn weed killers.

Thermometers for the greenhouse and rain gauges are best bought from your hardware store of Amazon like the tri dial weather station.

Even the RHS promotes the use of a homemade Measuring Stick

Beginning Gardening Tips on Bulbs for Beginners

Beginning Gardening Tips on Bulbs for Beginners

Narsicci

These short tips are designed to help you avoid failures and give you success without having to worry about too many rights and wrongs. You haven’t missed spring yet but to get going you need a quick win!

Quick Wins with Bulbs

It is hard to go wrong with bulbs. (The flower is already sealed within the bulb and they just need a bit of help and protection from you).
In February you can buy pots of daffodils, tulips, grape hyacinth and crocus that have been grown for you. It is easy to put them into bare soil, a container or bigger plant pot and wait for them to flower.
I would take them out of the retailers pot as they will have been grown tightly packed together but I wouldn’t try to separate them. Plant them at the same depth as they have been grown so you do not need to excavate a deep hole.
When planted in the ground or a new container water them gently.
Daffs and crocus will flower again next year but the tulips may not survive (it won’t be your fault, it is just nature)

Summer Bulbs

  • Summer bulbs are the next job to get great colour this summer with minimum know-how and effort.
  • In March or April clear weeds from a patch of garden  and you have made a flower bed.
  • Break up the top of the soil so water and air can get down to the plants then individually bury your bulbs twice as deep as the bulb . The soil on top of the bulb will be double the depth of the bulb.
  • I would start with some short stemmed Lilies and if I know my garden is very wet I would but some sand or gravel at the bottom of the planting hole. If you are not sure which way is the top and what is the root then lay the bulb on the side and let the plant choose.
  • Gladioli, Begonnias and Dahlia will all produce very colourful shows in summer. Glads have a nobbly bit at the top, begonias have a slight hollow and Dahlias have a twiggy bit to show which way up to plant them.
  • Read the instructions on the packet for general guidance but you do not need to slavishly follow everything they say.

Rosy

Beggars Begonias

Read More Read More

Free Roses

Free Roses

Climber

You can grow more Roses for free by taking cuttings but do not expect a 100% success rate. You should get more than 50% so just take more cuttings!

Roses from Cuttings

  • Select some healthy green canes that have become a bit woody in September.
  • Cut 8 inch lengths, just above a bud eye at the top and below a bud eye at the bottom. Remove lower leaves.
  • Fill plant pots with a mix of sharp sand and soil 2:1 and push in the cuttings half way.
  • Water and keep  in a sheltered spot until Autumn.
  • To over winter,  protect  the cuttings by burying the pots in a trench or keeping them in a lit, frost free environment.
  • In late April rooted cuttings can be transplanted. Do not let them bloom in the first year to build up some strength.
  • From a summer cutting that has not become woody remove lower leaves leaving a small part of the leaf stalk. Cut a cross in the base and hold it open with a grain of wheat to act as a natural hormone. Soak the stem in water overnight and plant in a soil & sand mix.

Roses By Layering

  • Ramblers and roses with very long stems can be layered in spring.
  • Choose a long stem that is growing close to the ground.
  • Leave it attached to the plant, lay it horizontally and remove the leaves where it touches the ground.
  • Carefully make an incision in the bark on the underside of the stem, cover with 2″ of soil and leave the tip of the stem exposed.
  • Peg the stem down with bent wire, water and leave until late Autumn or spring. When rooted it can be cut from the mother plant with secateurs.

This rose is available from

Plants from Thompson & Morgan not quite free.

Claude Monet Artists’ Rose. ‘This truly exquisite hybrid tea rose leaves you spellbound by its ever-changing colour combinations. Each bloom is a unique work of art, with layers of fragrance that form a pyramid. The first scent you smell is that of bergamot and lemon. Go back an hour later and discover rose, pear and vine-peach. If you cut the stem and put it in a vase, on the base notes of green almond, ivy and vanilla remain.’

Unfortunately it is not free at £11.99 but any cuttings from it will be.

St Davids Day Flowers

St Davids Day Flowers

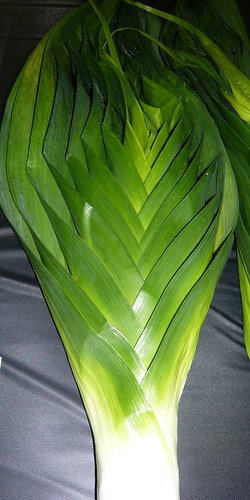
St. David  is the patron saint of Wales and March 1st  is celebrated as his saints day and a patriotic & cultural festival by the Welsh. The leek is the national flower of Wales. Welsh people all over the world proudly wear the stalk, flower or a bit of leaf from a leek plant on March 1st.

The daffodil is quite a bit easier to find, yet the leaves look similar, so many use daffodils instead. It is now common to find both Leeks and Daffodils as national emblems for Wales.

History and Legend

‘Today the Welsh wear a leek in memory of some ancient battle against the Saxons where Bishop David advised them to wear leeks on their hats to distinguish themselves from  their enemies. Swords clashed as the men of Wales fought on for hours try to protect their land from the Saxon invaders. Despite their great efforts, the Welsh were slowly losing. In the heat of the battle it was difficult to tell friend from foe. The fact that both sides wore similar clothing made the fight all the more confusing.

A monk noticed that this was becoming a grave problem. As the Welsh lost more and more ground, the monk cried out to them, “Welshmen, you must mark yourselves so that you can better tell who is Saxon and who is Welsh. The monk plucked a leek plant from the ground and continued, “Here, wear these so you will know that any soldier who does not have a leek is your enemy.”

Some of the soldiers thought this was a rather odd idea, but the monk was one of God’s men so they went along with it. Soon every Welsh soldier was wearing a leek on his helmet. They attacked the invaders and before long, the Welsh had won the battle.

The monk who came up with the idea of wearing a leek was named David. David died on March 1st. After he died, the Catholic Church made him a saint.’

Read more about Leeks on Gardeners Tips

Growing Pots of Grass

Growing Pots of Grass

This is not an injunction to grow Pot, Hash, Skunk, Kief, or Marijuana all correctly forms of Canabis sativa relatives of which produce hemp. Rather my suggestion is to use a  pot or container to grow a collection of Grasses.
Contrasting colours, textures, habits and heights will provide long lasting interest. The grasses will be tactile and give a sense of movement in a breeze.The pot can be moved around to change the display.

The combination of plants are endless but this is a selection of easy to grow and obtain grasses that you could start with.

  • Miscanthus sinensis ‘Variegatus’
  • Carex flagellifera
  • Carex comans ‘Frosted Curls’
  • Stipa tenuissima
  • Festuca glauca ‘Golden Toupee’

How to Pot Up
Select a pot, 15″ diameter will hold the 5 plants.
Put broken crocks or stones at the bottom of a container with holes for drainage.
Half fill with compost containing slow release fertilizer and water storing gel granules.
Cram the plants in close together to get an instant effect.
Pack in the remaining compost around the roots and sides of the plants.
Put some pebbles or grit on the surface of the compost to retain moisture.
Water and enjoy the display.