Browsed by
Category: Fruit, Vegetables & Herbs

Tips on growing good Fruit, Vegetables and Herbs

Coloured and Species Raspberries

Coloured and Species Raspberries

Raspberry row

Red Raspberries

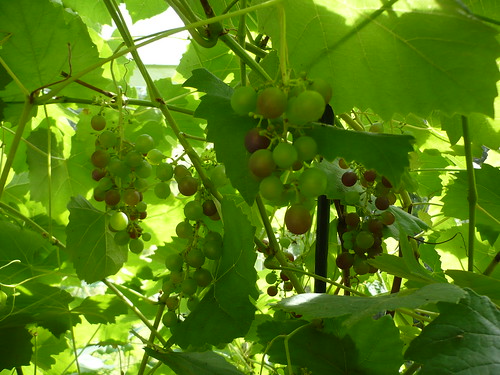
A 20-foot row of raspberries (Rubus idaeus) will yield a good crop over several weeks. Enough for jam, puddings and eating fresh.
A traditional hedge-type planting will yield twice the fruit of single trained canes but takes at least twice the space.
Intensively trained berries are extremely productive on single stems against a wall or fence.
To get the most from red raspberries, plant at least two kinds, an early or main crop variety for heavy early summer harvests, and an autumn or continually-bearing type.

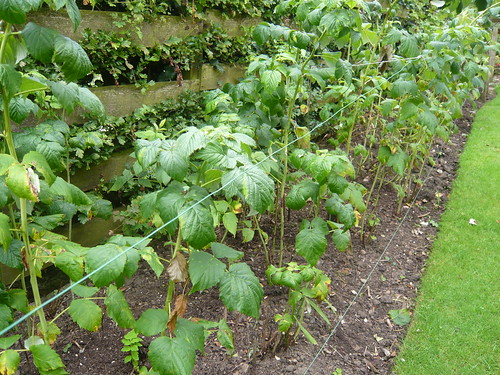
It’s a mistake to cut raspberry canes back in an effort to make the canes self-supporting. You get the best results by tying the canes to two wires at 2-1/2 and 5 feet off the ground. The most fruitful buds are those nearest the top of the canes.

Autumn raspberries fruit on new canes at the end of their first growing season and again the following summer. For heavier crops, prune the canes to the ground after the first harvest in autumn and forego the summer crop. Raspberry ‘Autumn Bliss’ is one of the best and most reliable primocane or autumn fruiting varieties. They produce a heavy crop of large, attractive red berries from late August until mid October.

Wild Black Raspberries, SW MO

Black Raspberries

Rubus occidentalis commonly known as “blackcaps” are occasionally cultivated providing both fresh and frozen fruit with a distinctive, richer flavour and high fiber content.
Although closely related to the reds, black raspberries have a distinctive flavor, ripen a little later, and require slightly different training.
Black raspberries spread by bending the tips of their canes to the ground where they root. In an attempt to bend to the ground and root, the canes elongate and become thin and weak at the tips. Unless you want to start new plants, cut these canes back to 3 or 4 feet.
Cut the old canes out after harvest. Since black raspberries don’t throw root suckers, they take much less thinning than reds.

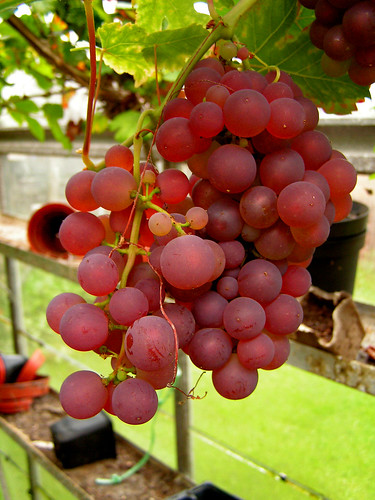
Purple raspberries have been produced by horticultural hybridization of red and black raspberries.

Raspberries

Yellow Raspberries

Raspberry ‘Allgold’ Rubus idaeus is an autumn fruiting yellow raspberry.
There is an orange raspberry also called golden raspberry. It is quite delicious and grows just like regular raspberries – ie on canes held high.
pale-yellow natural or horticultural variants of both the red and the black raspberry species have albino-like fruit resulting from recessive genes that impede production of anthocyanin pigments.

Raspberry Species

credit Wikipedia
Rubus crataegifolius (Korean raspberry)
Rubus gunnianus (Tasmanian alpine raspberry)
Rubus idaeus (European red raspberry)
Rubus leucodermis (Whitebark or Western raspberry, Blue raspberry, Black raspberry)
Rubus occidentalis (Black raspberry)
Rubus parvifolius (Australian native raspberry)
Rubus phoenicolasius (Wine raspberry or Wineberry)
Rubus rosifolius (West Indian raspberry)
Rubus strigosus (American red raspberry) (syn. R. idaeus var. strigosus)
Rubus ellipticus (Yellow Himalayan Raspberry)

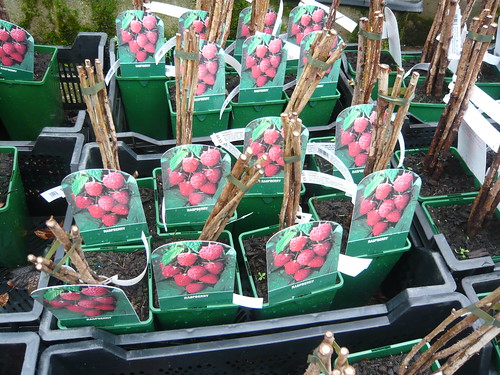
You can buy several red raspberry varieties mail order from Thompson & Morgan

Several species of Rubus are also called raspberries that are classified in other subgenera, including:

Rubus arcticus (Arctic raspberry, subgenus Cyclactis)
Rubus deliciosus (Boulder raspberry, subgenus Anoplobatus)
Rubus nivalis (Snow raspberry, subgenus Chamaebatus)
Rubus odoratus (Flowering raspberry, subgenus Anoplobatus)
Rubus sieboldii (Molucca raspberry, subgenus Malachobatus)

Credits

Wild Black Raspberries, SW MO by MarkInspex CC BY-ND 2.0
Raspberries by MonkeyBoy69 CC BY-NC-SA 2.0

Getting Grapesvines to Grow Fruit in the UK

Getting Grapesvines to Grow Fruit in the UK

Grapes

Tips to Grow More Grapes

  • Grape vines produce fruit on “this year’s growth” coming from “last year’s side branches” (canes). Grapes produce the most fruit on shoots growing off of one-year-old canes. New growth coming from older branches does not produce fruit.
  • If you prune back your vines completely each year, then you get lots of new growth but few grapes
  • New grape vines can take 2 to 5 years to produce fruit
  • Insufficient drainage and too much water will cause very few grapes or no grapes at all
  • Stop watering grape vines in Autumn so that the vine will harden itself up for winter
  • Trim shoots to encourage energy to be channeled into fruit production.
  • Grapes like dry poor soil so if you over feed you will get tons of leaves and no grapes.
  • For older vines with thick stems apply Epsom Salts every other autumn but feed them March, May and July with balanced fertiliser. This provides them with food at bud-break, fruit set and mid-way of the fruit development.

Pruning to Get Grapes to Fruit

  • Prune the laterals to 2 or 3 buds, but do not remove the laterals that will shape your plant.
  • Prune the side branches, leaving two or three buds each.
  • Prune out any dead or unwanted growth and vines will produce fruit on one year old growth.
  • Pruning grapes in late November -January. Later pruning will encourage excessive bleeding from the cuts as the sap rises.
  • Prune all the way back to the main stems will cause new growth and many more flowers.
  • Training and pinching out of new shoots and thinning of fruits is carried out in spring and summer.

 Black Hamburg

Advice from RHS

‘The cordon or ‘rod and spur’ pruning system is usually used for indoor grapes in greenhouses or conservatories,

Young Vines
Let two of the side branches produce a bunch of grapes, then pinch back their tips to two leaves beyond the bunch of grapes
Pinch back side branches not bearing fruit to five leaves.
In December reduce the main stem by half, cutting to a bud on mature brown wood. Cut back side shoots to 2.5cm (1in) or to two strong buds.

Year three onwards

In January untie the main stem to one third of its length above ground.
Allow the top two thirds to bend down and almost touch the ground. This encourages side branches to break along the full length of the stem
In the growing season as soon as the buds on the spurs (knobbly bits where the main side branches were cut back to a single bud) begin to grow, tie the main stem back into position against its supports.
Pinch out the growing tips of flowering side branches two leaves beyond the flower cluster, allowing only one flower cluster to develop per side branch for dessert grapes. More clusters can be allowed for wine grapes
Tie in each flowering side branch to a wire
Pinch out non-flowering side branches to five leaves
Pinch out any side shoots growing from the side branches to one leaf
For wine grapes, allow all bunches of grapes to develop. For dessert grapes, allow only one bunch per side branch
Cut back the side branches to one or two plump buds from the main stem.’

More UK based grape growing advice from the RHS.

Quaffable Quotes

The wrath of grapes comes from a lack of fruit.
Have you heard any more on the grape vine?
Did the green grape tell the purple grape to Breathe!
Did the grape that got stepped on let out a little wine?
Vini Vidi Vino


Photo Credits
Grapes by dichohecho CC BY 2.0
Black Hamburg by keaw_yead_3 CC BY-NC 2.0
Grapes by freefotouk CC BY-NC 2.0

Grapes

Spring Onion Gardeners Tips

Spring Onion Gardeners Tips

Tips from Gardeners on Spring Onions  (Allium Cepa)

Do you like a crisp spring onion. White Lisbon is a variety grown from seed that will grow quickly and produce some nice strongly flavoured salad onions.
If you can find a variety White Spanish try that for a milder flavour.

  • Sow seed from early March if you can give them some protection.  ( Thompson & Morgan sell various varities of Spring Onion and other vegetable seeds)
  • Alternatively over winter an October sowing for onions from April.
  • Try sowing direct into a grow bag. Warm the bag in the house for a couple of days or in a heated greenhouse.
  • Pull young onions alternately to leave space for others to grow
  • All early onions pulled this way can be used as salad onions
  • Fertilise with a light sprinkling of sodium nitrate in wet weather to help them bulk up
  • Spring onions grown from seed are possible throughout the year  by sowing every 4 weeks from early spring to autumn.
  • Keep the ground free from weeds. All onions dislike the competition from weeds and other plants.

Know your onions

Bunching Onions are a trendy name for Spring onions. Varieties include Ciboule, Performer and Ishikura.

Spring onions (Allium Cepa) are part of the Allium family that includes:

Garlic

Chives

LeeksPot Leeks & Blanching Leeks

Shallots and Pickling Onions

Welsh onions and Japanese Onions

Ornamental Alliums

Vegetable Families their Importance and Types

Vegetable Families their Importance and Types

The importance of rotating vegetable crops to keep soil in good heart and avoids disease build up has been know for millennia. Gardeners should rotate families of similar vegetable using the lists below, not just switching for cabbages to cauliflowers.
Vegetables from the same family often need similar culture or treatment and suffer from similar pests. Fresh soil helps.

Families of like vegetables need similar nutrient levels and attach importance to different fertilizers.

Aubegine

Cucurbitacea – the marrow family

Leguminosae – Fabacea

Compositae – Daisy Family

  • Chicory – Endive
  • Jerusalem Artichoke
  • Lettuce
  • Salsify and scorzonera

Read More Read More

Bare Rooted Raspberry Canes or Plants

Bare Rooted Raspberry Canes or Plants

Spring raspberry canes

These raspberry canes were available from my local garden centre March 20th. They look container grown but are bare rooted canes plonked into pots. Container grown plants look like a bunch of healthy canes growing from the same root stock.
If you can’t get to Swincar Nursery in Guiseley and who can, then you can buy the following varieties mail order from Thompson & Morgan

Raspberry ‘Glen Moy’ (Early season summer fruiting) – produces an abundance of firm, medium sized fruits from June to July on virtually spine-free canes, which make harvesting a pleasure.

Raspberry ‘Glen Ample’ (Mid season summer fruiting) – Exceptional high-yielding mid season variety, producing a heavy crop of large, deep red, succulent berries, with superb flavour.

Raspberry ‘Polka’ (Late season autumn fruiting) – This superb Polish bred primocane variety produces up to double the yield of its parent, Raspberry ‘Autumn Bliss’, and crops at least 2 weeks earlier.

Raspberry ‘Autumn Bliss’ ‘is one of the best and most reliable autumn fruiting varieties, producing a heavy crop of large, attractive red berries from late August until mid October. The delicious fruits have an excellent flavour and firm texture making them ideal for eating fresh from the plant or freezing for another day. The short, sturdy canes of Raspberry ‘Autumn Bliss’ makes them perfect for growing in smaller gardens and containers as they don’t require supports for their stems. An excellent British bred variety, with good resistance to raspberry root rot disease. Height: 59”. Spread:20”.’

See also
Coloured and species Raspberries
Growing and maintaining raspberries
Raspberries Spring Summer and Autumn

Bare-root or Pot-Grown Plants

Bare-root plants are only delivered in the winter season for planting from November to March when the ground is not frosty.
Pot grown plants can be delivered all year round but take care as this photo shows barerooted plants have been stuck in a pot for retail purposes!
Bare-root plants cost less for the same size plants and you can carry and plant them easily.

Pot Grown plants can be delivered & planted all year round.
Plants in pots can be kept for months if there is a delay in planting.
If you can’t wait to get planting then buy pot grown plants, otherwise order bare roots.

Fresh Winter Herbs and Preserving Herbs

Fresh Winter Herbs and Preserving Herbs

Herbs for winter flavour in your food can be kept fresh or preserved direct from your garden. Most herbs can be dries and Mint can even be pickled so have a go at herb preservation.

Parsley

Prolong your Fresh Herbs

Many herbs die down in open ground during winter. It is worthwhile digging up and potting up a clump of herbs for the cool greenhouse or kitchen windowsill. Chives, Parsley, Mint, Marjoram, Basil and Thyme are suitable subjects. Winter herbs need plenty of light, cool conditions, occasional ventilation and regular watering. Remove dead and dying leaves and flowers immediately.
Basil -  Ocimum basilicum
Basil is treated as an annual but leaves can be dried.

Cuttings taken in summer can be used indoors for fresh herbs.

Supermarket herb pots are now a convenient way to enjoy fresh herbs. Look after them as suggested above. Do not subject them to a chill as they will have been grown very tender.

Drying and Preserving Herbs

Sprigs of herbs are easiest to handle when it comes to drying over trays, frames or on paper. Leaves need turning several times in the first couple of days. Microwave ovens are problematic as they can cook rather than dry your herbs (use short settings and test for brittleness as you go). Drying trays can now be bought from good garden centers. For large quantities, artificial heat in a temperature and humidity controlled drying room may be worth the investment.

Stems can be tied and bunches left to hang in a warm airy atmosphere but control is hard and end results are more difficult to predict.

Chamomile can be dried in the plate warming part of your oven (let the moisture escape). Laid sparingly over newspaper, seed heads such as Fennel and Dill can be dried (but fennel itself will flop rather than dry). When dry keep mthe leaves and stems such as Marjoram can be thrown away.

Rubbing down to get the dry leaves should be done with gloves and a smog mask if large quatities are involved. Normally only enough herbs for winter are required so large quantities are not involved. Storing in dark, air-tight containers such as glass jars is best. Dried herbs deteriorate if exposed to light and can easily reabsorb moisture.

Our trimmed bay tree
Bay is an evergreen plant. The leaves can be used all year round to flavour soups and meat.

Mint can be pickled in vinegar which becomes a popular way to eat the herb.

Photo Credits
Parsley by -Mandie- CC BY-NC-ND 2.0 ‘I picked and dried some of my Parsley this week. This is part of what I’ve left in the front yard, which might make it, considering it’s close to the house, on the south side…..’
Basil – Ocimum basilicum by Jasmine&Roses CC BY-ND 2.0
Our trimmed bay tree by exfordy CC BY 2.0

Courgettes, Gourds, Marrows and Squashes.

Courgettes, Gourds, Marrows and Squashes.

gourds

I have tried several varieties of Curcurbits this year but still haven’t got around to Cucumbers and Melons.

Courgette and Egg plant

Courgettes

  • I have planted one in half a grow bag cut across and stood on its end to keep it free of slugs (I hope) and make it easy to jeep watered.
  • The last bucketful from my old compost heap has gone under another ‘Green Bush’ courgette as they are voracious feeders and need some water retention within the soil.
  • An old trick was to grow courgettes on the top of a mound (of old compost) so the leaves did not become water logged and start rotting.
  • Courgettes are a family favourite vegetable when picked small and fresh and you can even eat the flowers.
  • Courgettes are of course young Marrows and if left to grow they will swell and eventually produce seed. In many varieties the flavour and texture suffers so I pick mine young.
  • Courgette seeds at Thompson & Morgan

Pumpkin

Gourds & Pumpkins

  • As a child I wanted to grow the exotic shapes colours and textures of the gourd family but seldom achieved a good crop.
  • In many cultures the fruit of the Gourd is used as a container or vessel.
  • Plant the seeds on their side so water runs away from the flat centre.
  • Some varieties to try include ‘Autumn Glory’ an attractive climbing/spreading variety, ‘Dinosaur’ a bottle-shaped gourd with wrinkled green skin, ‘Speckled Swans’ Intriguing gourds with lifelike crooked necks that can be dried and painted or  ‘Russian Dolls’ that can be harvested at various sizes, dried and painted.
Growing and Pollinating Sweetcorn

Growing and Pollinating Sweetcorn

Peaches and Cream | 191/365
Sweetcorn is one of my favourite vegetables. Even when it comes out of a tin it is OK but fresh Sweetcorn boiled then smothered in butter is a treat that makes these plants well worth growing.

Planting Sweetcorn (Zea Mays).

  • Each seed is the shape and colour of a pip from a sweetcorn cob. They germinate quickly in warm conditions.
  • Sow seeds in mid spring 4 weeks before the last frost in your area.
  • Plant out 18in apart in blocks rather than rows when all danger of frost has passed,
  • Sweetcorn seed is available from Thompson & Morgan
  • If you try F1 hybrids don’t grow next to standard varieties or the cross pollination may cause the cobs to lose some of its sweetness.

Pollinating Sweetcorn and Growing On

  • Pollen from the male flowers, above, falls or is blown onto the female flowers or tassels, below, which when fertilised will form the cob.
  • To get good pollen distribution it is worth growing plants in square or rectangular blocks not long rows.
  • Hand pollination can be tried, dust female tassels with an open male flower or run your hand down the male flower and transfer the pollen onto the female tassels.
  • Once the silks or tassels start to form on the cobs regular watering is helpful.
  • To check that the cobs are ready to be picked pull back part of leaves covering them and squeeze one of the grains, if the liquid is thin and creamy, not watery, the cob is ready.

Sweetcorn Mini Vegetables

  • Miniature sweetcorn Minor produces tiny corn cobs for Chinese cooking and casseroles and crops in 64 days
  • The baby corn of Sweetcorn Minor are harvested before pollination just as the ‘silk tassels’ begin to show.
  • Sow seeds in mid spring 4 weeks before last expected frost in your area, singly ½in deep in 3in pots of compost.
  • Plant out 4-5in apart in rows 8in apart when all danger of frost has passed in blocks of short rows rather than one long row.
  • A warm sheltered position in fertile, moist yet free draining soil is best.
  • Plants will still grow tall, the only thing miniature is the cobs.
  • Keep free of weeds and water regularly.
  • Harvest the tiny cobs when the silks first show above the husks. What you are harvesting is the immature corn on the cob.
  • Under ideal conditions each plant should bear 4-6 cobs. If you forget to harvest on time a normal sweet corn will be produced.

sweetcorn - mini pop

Eating Sweetcorn

  • Miniature cobs are ideal raw, steamed, stir fried or with dips.
  • Also very tasty cooked, then tossed in parsley butter or served with a cream sauce.
  • Maincrop Sweetcorn are good when barbecued or grilled.
  • Sweetcorn adds starch to chicken or fish soup.

There are ‘mini corn’, ‘super sweet’, ornamental and traditional sweetcorn varieties waiting for you to try.
I don’t recommend more than one variety per season to avoid cross pollination which makes the kernels tough and poor eating.

Tips for Tender Sweetcorn not Green Giant

  • Sowings should be kept warm and dark
  • Plants must be grown on in the warm & allowed to get to 4″ plus before being planted out.
  • Plant out in square blocks of say 7 by 7 plants so they can help pollinate one another
  • Plant with low growing beans or peas to provide nitrogen at the roots.
  • Give a feed of nitrogen when the tassels have formed
  • Test if the cob is ripe by pinching the top of the cob inside the protective leaves. If it is pointed it needs longer but if it is flat it is ripe.
  • The traditional ripeness test is to open and squeeze a kernel to see if it is milky
  • Eat sweetcorn soon after picking whilst the sugars are at there best

Credits
“Peaches and Cream | 191/365 by mfhiatt CC BY-NC-SA 2.0
flickr.com/4074/4850146990_2196ec5d68. and /4120/4850147310_da417ac2b8.
sweetcorn – mini pop by Lucy Crosbie CC BY-NC-ND 2.0

Tips for Growing Tasty Tomatoes.

Tips for Growing Tasty Tomatoes.

Green Tomatoes

There are few things that can beat the taste of home grown tomatoes. Growing tomatoes is not straightforward, they require constant attention throughout the year. However, they can be one of the most rewarding vegetables to grow. You will have no shortage of friends when you start to distribute home grown tomatoes…

Sowing Tomato Seeds

Sow seeds in Feb through to April. If you start them early they will need more early season protection, but, they will give a longer cropping season, rather than just a cropping season in late September / October.

In the UK, tomatoes will need to be grown under glass for most of the growing season. In the south, you will get some success from growing outside, but, you will gain a bigger crop by growing in a greenhouse.

Preventing Disease.

Tomatoes are susceptible to disease, especially when grown in greenhouses. These tips will help to prevent disease.

  • Avoid waterlogged soil
  • Replace the soil each growing season because many diseases remain in the soil. Use soil rotation techniques.
  • Keep the greenhouse clean and tidy of any dead and diseased leaves.
  • If any part of a tomato becomes effected with fungal rot make sure you remove it immediately to prevent it spreading.
  • Ensure good ventilation, remove lower leaves to give more air around the bottom of the plant
  • Deal with infestation of insects such as greenfly as they will help spread disease.
  • Disinfect the greenhouse at the end of the growing season with Jeyes Fluid

tomatoes

Watering.

  • After planting out your tomato plants do not water for 7-10 days so the roots start to seek nourishment and grow
  • Before fruits start to form, it is advisable to be moderate in watering. If you water and feed, you will just get more growth of the stem and they will be taller; this will not increase yields, but make them more unmanageable. However, once the fruits start to form it is important to ensure a good water supply, as it is essential for the formation of ripe fruits.
  • Tomatoes can need watering twice a day, if grown in growbags.
  • If you rely on a neighbour to water whilst you are away, make sure they are reliable and make sure they water in sufficient quantities.
  • Bury a plant pot alongside your tomato plants so watering is easy and it gets down to the roots
  • Tomatoes feed on roots near the surface and drink from deeper tap roots. Good watering makes for good tomatoes.

Feeding Tomatoes

Tomatoes are hungry feeders and definitely benefit from Tomato food during the formation of fruits once the first truss has set. This is particularly important if grown in grow bags

Support and Pinching Out.

For Cordon varieties of tomatoes, make sure you pinch out side shoots so that the plants focus their energy on a single stem. If you don’t you will get a lot of green growth and not many fruits. Also after about 7 branches develop, pinch out the top of the plant and focus on these 7 branches and their fruit.

This is an important tip, often forgotten by first time tomato growers. If you don’t have time to pinch out sideshoots, grow bush varieties.

Support your tomato plants with strong canes and string. They become very heavy with fruit.

Optimal Heat for Tomatoes

Tomatoes like a warm temperature. However, you should try to avoid temperatures above 85 F. In the height of summer, you will need to whitewash your green house and water down the floor of the greenhouse in the morning. The optimal temperature is around 75 to 80 degrees.

Tomatoes and Marigolds.

It is suggested growing marigolds or poached egg plants in between tomato plants to encourage hover flies who eat greenfly.

Tomatoes in grow bags.

Tomatoes in grow bags can be a good way of changing the soil every year. One tip is to use a double grow bag. cut a hole in the top of one and the bottom of another giving a double layer of growbag. This makes watering easier and gives the soil more reserves.

Popular Varieties of Tomatoes

My Tomatoes 2012

  • I like variety and am growing 5 types of tomato this year.
  • Moneymaker is my main cordon variety that I will keep in the greenhouse and pinch out.
  • Sunbaby yellow cherry tomatoes will go in the greenhouse along with the old favourite Gardeners Delight.
  • Garden Pearl is a new venture for me bred for hanging baskets I will try this cherry tomato in a container.
  • I expect least from an outdoor Marmande a beefsteak variety.

Cherry-Tomato-Plants_Autumn__55843
Cherry-Tomato-Plants_Autumn__55843 by Public Domain Photos CC BY 2.0

Success Growing Coriander

Success Growing Coriander

How hard can it be growing Coriander? Not very and it is even easier with these secrets of success from expert gardeners.

Coriander

Successful Coriander Growing

  • One of the easiest herbs to grow from seed. Sow directly outside in a herb patch, container or on a windowsill.
  • Coriander appreciates full sun and good soil without frost.
  • In the right conditions it will grow like crazy but dislikes its long tap root being disturbed.
  • Harvest when leaves are 6 inches high and sow crops every 3 weeks for a continuous supply.
  • Coriander is rich in vitamins A and C and can be used fresh in curries, stir fries and salads.
  • Coriander is a Mediterranean plant and once established does not need much water.

Coriander

Coriander from Seed

  • Seeds at Thompson & Morgan
  • Other names for Coriander include Coriandrum sativum, Cilantro, Chinese Parsley or varities Calypso and confetti
  • Sow coriander seed outdoors from April to July in light, well-drained, fertile soil, which has been raked to a fine tilth.
  • Choose a position in full sun. Sow seed thinly at a depth of 1cm (½in) in rows 30cm (12″) apart.
  • When large enough to handle, thin seedlings to 23cm (9″) apart.
  • Can also be sown in late summer for winter use, with cloche protection and full light for quality foliage production.

Photo Credits
Coriander by John and Gill CC BY-NC 2.0
Coriander by YaelBeeri CC BY-NC 2.0
Coriander by jbhangoo CC BY-ND 2.0

Coriander
Coriander all dressed up and nowhere to go except into the cooking!