Easy to Grow Aloe Vera Plants

Easy to Grow Aloe Vera Plants

Aloe Vera
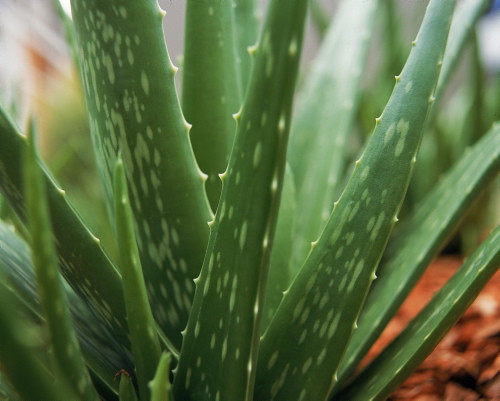
There are around 200 African and 300-400 other species in the genus of Aloe flowering succulent plants. The best known and easiest to grow is Aloe vera, or “true aloe”. In the UK it is not frost hardy and is most frequently grown indoors.

Easy Growing Tips

  • Aloe vera are succulent plants made up from 90% water and hold the water for long periods.
  • Aloe vera stores food, liquid and nutrients in its leaves to compensate for days when it does not have access to water.
  • The leaves are thick to protect Aloe vera from drying out.
  • Aloe vera plants have strong photosynthetic properties and will need more exposure to sunlight than regular plants.
  • In winter they do not need much water as they will grow much slower due to low light conditions.
  • Aloe grow small plantlets as offsets to increase your stock. Also a young spikey stem will root quite easily to grow more plants to pass on to others.

Aloe Vera Indoor Plants

  • There are several uses for the Aloe sap but do not crop a young plant too often.
  • Aloe variegata have a better leaf form with a triangular V section
  • Aloe brevifolia forms a large rosette of leaves in little colonies of small plants
  • Some aloe flower indoors but their shape and form is the main reason for their cultivation.
  • Over watering can cause the thin roots to rot.

Photo Credits

Aloe Vera by Powerhouse Museum CC BY-NC-ND 2.0
Aloë Vera by Rutger Middendorp CC BY-NC-ND 2.0

Aloë Vera

This Aloe vera plant has been grow in a mixed medium of gell to make a welcome novelty gift.

How to Extend The Life of Garden Tools

How to Extend The Life of Garden Tools

We live in a consumerist society where we tend to just buy new things rather than make existing things last longer. Garden tools are an excellent example of how we can make things last rather than keep buying cheap tools every couple of years.

Buy Good Quality

Firstly buy good quality garden tools. They may not be the cheapest, but, they should be seen as an investment to last a long time rather than a disposable item. Ironically, buying cheap tools frequently can be more expensive than buying good quality tools that last a long time.

Clean After Use.

After using a spade or secateurs spend the odd minute to clean off the gunk. Knock off the soil from a spade and give a quick wipe down. With secateurs and shears it is even more important to clean after use because the sap of plants will reduce the sharpness of tools and significantly reduce its life expectancy. Wipe away the sap with a cloth and give a quick spray with WD 40 or other water repellent spray. Taking a minute to clean your tools will definitely repay the effort. It is also much nicer to use tools which are clean to start with. Dirty tools become a disincentive to start gardening.

Read More Read More

How To Grow Asparagus

How To Grow Asparagus

Asparagus
Asparagus

In the days of year round vegetables the allure of home grown vegetables has been somewhat diminished. But, if you have ever eaten homegrown asparagus freshly cut from the garden you will know it is a delicacy well worth enjoying. I even recommend avoiding asparagus out of season and only eat home grown, freshly cut asparagus. You can’t beat the real thing.

Important Tips for Asparagus

Growing asparagus needs a certain amount of patience. In the first year you can take very little from the plant. However, if properly prepared, asparagus beds can provide a long running output of delicious asparagus stems for the kitchen.

How To Grow Asparagus

  • Choose a well Drained patch of soil. Asparagus hates to have its roots sitting in damp and boggy ground.
  • The best time to plant roots is in March.
  • If you have heavy soil work in some grit to improve the drainage of the soil.
  • Measure out beds 1m (3ft) apart
  • Make 2 ridges about 1 feet apart running down length of bed
  • Drape the crowns over the ridges so that the roots hang down the slope
  • Shovel the topsoil back over them, making a raised bed as you do so.

Read More Read More

Kneeling Stool for Gardeners –

Kneeling Stool for Gardeners –

Dodgy gardeners knees? the treat yourself to a padded stool with arms that help you get up again. Not much use for spade work but invaluable when wielding a trowel.
 

Book Cover

This is a useful Stool which can be used for kneeling and sitting. The stool doubles up as a kneeling pad with easy handles for getting up off the ground and also as a lightweight seat. Versatile and especially useful for the garderner who has to do a lot of weeding. Kneeling stool at Amazon.co.uk

Advantages of the Kneeling Stool

  • Keeps knees from getting muddy
  • Avoids compacting the soil around the kneecaps but spreads the weight around.
  • Easy to move around the garden.
  • Provides an instant seat for when you feel like a cup of tea!
  • Cheap
  • No Maintenance

Thet represent a very good value and would make an excellent gift for an ‘older’ gardener. Often one of the most difficult things for old people is to lift them up from ground level. This provides an effective support whilst lifting off the surface.

How to Attract Bees into your Garden

How to Attract Bees into your Garden

Bees are not as attractive as butterflies but they are an essential part of our ecosystem. Your garden and the environment will benefit from bees twice over as they provide a visual spectacle whilst helping with pollination.
A garden full of bee catching and eye catching flowers from spring to autumn can be achieved by selecting some of the following plants.

Bee in May

Bees feed on nectar and need this energy giving resource as they transport pollen from one flower to the next. They also need water from moist soil.

Flowers Attracting Bees

  • Sweet Violets – viola odorata
  • Shasta daisy and Coreopsis in summer
  • Buddleia the butterfly bush in white pink or lilac and Lilac also feed bees.
  • Foxgloves, Lilac, Michaelmas Daisy and plants like Globe Thistle
  • Delphinium, Aster and Day Lily
  • Phacelia tanacetifolia Benth, Echium vulgare and Borago officinalis are purple flowering bee loving plants. In addition to their honey-producing properties they also make an attractive addition to your border.

Read More Read More

Spare a Thought for Hedgehogs

Spare a Thought for Hedgehogs

Hedgehogs Erinaceus europaeus are good for gardens, eating through a large volume of slugs. They deserve some help to preserve hedgehog family life otherwise they will fall into further decline. However they are not domestic pets and like to be able to roam in several gardens each night.

Book Cover

Hedgehog Diet

  • Beetles 28% are a major part of hedgehog food
  • Caterpillars and beetles make up more than half of the food they eat
  • Earthworms are about 17% of the average hedgehog diet
  • Other items in smaller quantities include slugs, snails, birds eggs, millipedes, earwigs, and even birds or small mammals dead or alive.

Heaven For Hedgehogs
Make your garden Hedgehog friendly with a wild area from piles of leaves and twigs to be used for shelter.
Keep ponds topped up and ensure Hedgehogs can climb in  or fall.
A specially made hedgehog home (eg.from a box on its side) would include nesting facility in summer and a space to hibernate in winter.
Hedgehogs need to be able to travel in and out of the garden (even if that means they risk crossing roads).
Meat based pet food and fresh water in summer are a help to a hedgehog family.

Safety For Hedgehogs
Slug pellets containing metahaldide can kill. Avoid pesticides.
Bonfires should be checked for hedgehog nests before burning
Take extra care using strimmers on rough brash.
Keep netting at least 12″ above ground so hedgehogs can get under without getting trapped.
Look out for hedgehogs when turning or forking a compost pile.


The British Hedgehog Preservation Society is organising Hedgehog Awareness Week which this year runs from 5th 11th May 2013.

Dwarf Rockery Conifers

Dwarf Rockery Conifers

Dwarf Conifer

Not everyone wants a Leylandii hedge, in fact few gardeners want Leylandii at all. Fortunately there are other conifers and shrubs to suit most people. I have just introduced some new dwarf conifers into my rockery with a range of alpines.

Chamaecyparis obtusa 'Nana Aurea'

Chamaecyparis obtusa ‘Nana Aurea’ AGM

  • This is sold as being ideal for small gardens and rockeries
  • It will grow a pyramid shape with sprays of yellow tipped blunt shaped leaves.
  • Chamai, means ‘dwarf’ Aurea means gold and Obtusa means blunt shaped.
  • After 10 years it should be no more than 2 feet high by 18 inches wide
  • It is now planted in well drained soil in full sun but with some shelter from the wind.

Picea pungens 'Montgomery'

Picea pungens ‘Montgomery’

  • This I bought as a grafted shrub with blue needle like leaves
  • A slow growing blue coloured specimen due to grow to 20-30 inches in 10 years.
  • These pictures look a good bit taller than the shrub I hope to grow. Well here’s hoping the graft is on small stock.
  • Female cones are cylindrical, green when young, maturing to pale brown.

Cryptomeria Japonica 'Golden Promise'

Cryptomeria Japonica ‘Golden Promise’

  • Taking 20-50 years to reach 24 by 18″ this is a true slow grower
  • It should make a rounded shrub with green foliage turning creamy gold in the heat of summer.
  • By autumn there will be a purple tinge to the leaves but it is a hardy evergreen.
  • Also known as Japanese cedar.

Tips and Comments

  • I was inspired to try more plants after visiting Perennial’s York Gate Garden. They have many prostrate and vertical conifers on display but disappointingly will not let me show you the photographs. Not very charitable from the Gardeners Royal Benevolent charity!
  • I bought the plants at Slack Top nursery.
  • The visible labels are made from copper. You scratch the name into the soft material and they should age gently but remain legible. I bought them from Wilkinsons and hope they help me with the names as my memory fades.
Control of Pests on Apples & Pears

Control of Pests on Apples & Pears

‘Understand the pest and you are part way to controlling the problem.’

Brown Rot
This rot is often associated with storage when a fungus permeates the fruit. Fruit on the tree can be mummified and this prolongs the life of the fungus. There are no effective organic sprays so rely on good cultural management. Take care picking and storing fruit.

The rot starts through wounds caused by birds, wasps and scab. At blossom time the fungus causes wilt and shoots to shrivel. Remove all rotting fruit and bury rather than compost. Prune and burn branches killed by wilt.


Aphids
Of the many species the green or rosy apple aphids and the woolly aphids plus the pear-bedstraw aphid can be very troublesome. Aphids mate in Autumn leaving eggs to over winter on spurs crevices and tips. Heavily infested shoot tips and flower cluster should be cut out and destroyed. Encourage beneficial insects like earwigs and ladybirds.

Read More Read More

Causes & Cures for Bitter Pit on Apples

Causes & Cures for Bitter Pit on Apples

DSC_0125.jpg  Gascoigne's Scarlet.

Brown spots in the flesh of your apples is a sure sign of Bitter Pit. Along with dark depressions in the skin, brown sports dotted throughout the flesh is typical of bitter pit on your apple trees.
Bitter pit is a disorder not an infection or infestation.
Unfortunately the flesh of badly affected apple trees will also taste rather bitter

What Cause Bitter Pit on Apples

  • The disorder is usually brought about by a calcium deficiency.
  • Another potential cause is a susceptibility of the variety.
  • An erratic supply of water will also encourage the disorder.
  • Young trees that are putting on a lot of growth are also rather susceptible.
  • Early picking can cause bitter pit to develop during storage.
  • Dry conditions can reduce the calcium uptake even if it is present
  • Vigorous trees with copious leaf area need more calcium. Bramley’s Seedling and Newton Wonder are large fruiting cookers that are prone to the problem.
  • Trees without adequate Calcium will rob fruit of the calcium to sustain other parts of the tree.

How do you Cure Bitter Pit on Apples

    • Spray the developing fruit with Chempak Calcium mulit-action
    • Foliar sprays of calcium nitrate or Calcium chloride solution can be applied from mid-June to mid-September
    • Make sure your trees are mulched and well watered.
    • Some varieties such as Bramley Seedling and Gascoigne’s Scarlet are more prone than others. Check what grows well in your area and try plant those varieties, Gala is said to be free of the problem.
    • Prevention is the best cure using good cultivation practices.
    • Install irrigation to give tree roots access to moisture and natural calcium.
    • Add lime or chalk to the ground then rake and water in.
    • Do not store apples showing signs of bitter pit. Rather eat or cook with them asap.

Has your Granny Smith got black spots or is your Golden Delicious not totally golden then you may have bitter pit. This is not a fungal or insect borne disease but a chemical imbalance. Bitter Pit is a problem with the fruit on Apple trees caused by a shortage of Calcium. The fruit have dark, sunken spots on the surface, browning flesh and a slightly bitter taste. The problem can continue or start developing after harvest so inspect stored apples. Cork spot and Jonathan spot are similar to Bitter pit in that damage to tissue occurs mostly on the surface and just below. Although apples affected with these disorders are still edible they are unattractive in appearance.

Read about other Apple problems and control


Credits
DSC_0125.jpg Gascoigne’s Scarlet. by northdevonfarmer CC BY-NC-ND 2.0 ‘Gascoign’s Scarlet. These apples always seem to be affected by bitter pit here.’