Gardening Products

Tips for the Gardener

Raised Bed Systems

Posted: August 3rd, 2010 | Author: hortoris | Filed under: Growing Aids | No Comments »

raised beds

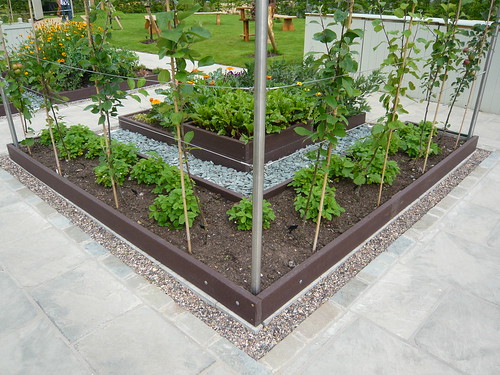
Marmax products make raised bed sides from recycled plastic and donated this set to the new library and learning centre at RHS Harlow Carr.
Hard wearing, long lasting and doing its bit for recycling this use of plastic in the garden is to be admired.

Supplied in flat pack, kit form the sides are in depths of 140mm so you can also make 280 or 420 deep beds by using 1-3 levels screwed together. In old money I make that five and a half inches 11″ and 17″ or thereabouts.

Other Methods.

  • The old railway sleepers took a bit of a dive when creosote was banned or frowned upon in gardens. The seepage of chemicals from sleepers seems small to me and the method is still popular if you find old sleepers.
  • Diy fanatics may use log piles or build more substantial retaining walls.
  • The BBC has a video featuring Monty Don that shows how and why raised beds are useful.
  • For more pictures and ideas on the type of raised bed have a look at these images

Uses of Raised Beds

  • Raised beds help improve drainage on heavy soil.
  • Beds warm up quicker when raised and can be angled towards the sun.
  • Smaller plants can be lifted for closer inspection or to get the perfume and it may avoid getting down on your knees.
  • Flowers, vegetables and soft fruit can all be successfully grown in a raised bed.

Plant Labels, Markers and Tags – DIY

Posted: August 3rd, 2010 | Author: hortoris | Filed under: Projects, Uncategorized | 1 Comment »

plant label brick

Do you ever think you have ‘dropped a brick’ when you can’t remember the name of one of your plants?
Do you yearn for something other than a small plastic tag with a pencil markings you need to be a contortionist to read?
Perhaps you reuse the colourful nursery plant labels that are bleached by the sun in one season?

Well pictured here are 3 home made methods of visually recording your prized plants.

Plant lables

This bed is edged with old slates and other slates for name tags are painted white. The size was 2.5″ by 6″ and the short edge was capable of being wedged into the soil. I would need to practice my script writing to get the feel of this old style naming but the effect was in-keeping with this bed of plants.

plant lables

Do not be fooled by the shape of these labels. As they say ‘a good big one beats a good small one any-day’. And these name tags were big as the Jardiniere was over 2′ tall so the name sticks were 3 feet plus. Not so obtrusive when well sunk into the garden but still visible without a microscope.

My favourite was the white brick (with the flat side). Other alternatives include engraved stones as labels, wooden tags and labels or aluminium diy labels from suppliers like Alitags.
The RHS has a web page of children’s projects to make fun labels, you just need a plant called ‘Blue Peter’


Telescopic Extending Garden Shears

Posted: July 29th, 2010 | Author: hortoris | Filed under: Tools and Equipment | 1 Comment »

Telescopic Shears

My wife has treated us to a pair of hedge trimming shears with telescopic arms. That is her in the garden, with uncharacteristic hands on hips, as she does most of the grass cutting and hedge trimming.

Tips for Shears.

  • Clean the shears of sap after you have used them. Never put away dirty or wet shears.
  • Do not try to cut thick stems with shears meant for fine work.
  • It is easier to sprain shears than to blunt them so do not twist them to get through an awkward branch.
  • Spray occasionally with WD40 or oil your shears
  • Buy the best quality you can afford – cheap equipment can be false economy.
  • Shears

    Operation

  • These shears operate as normal short handled shears most of the time.
  • To reduce stretching and to reach awkward places they extend by twisting a lock in the handle.
  • After unlocking pull out the extending handle to increase the length. For me it is either all out or all in but you can adjust the length to suit.

Swags and Ropes for Growing Roses

Posted: July 27th, 2010 | Author: hortoris | Filed under: Growing Aids | 1 Comment »

Swags

Swags are ropes slung between two points for training Roses and climbers.

Tips for Swags & ‘Rose on a Rope’

  • Ropes made from natural fibre like Hemp, Manilla, Sissal and Yucca are appropriate decoration in a rose garden.
  • Train the rose along the rope and it encourages flowering stems to break upwards.
  • Provide firm support as the ropes will be heavy when fully loaded with flowers.
  • The rope absorbs moisture and shrinks as it becomes wet.
  • Like all plant material it can be attacked by fungus which will cause it to discolour, rot and weaken.This can be substantially prevented by giving the rope a wood preservative treatment prior to fixing it in place.
  • W R Outhwaite (rose swag makers) recommend using either 1”diameter rope. ‘It is sufficiently chunky to be in scale with the supporting posts and of sufficient strength to carry any likely weight of plant growth with enough left over to give it a long life. Some people advocate even thicker rope but in our experience this can be very difficult to tension to remove the sag or drape between the posts.’
  • Ramblers or Climbers can be supported on ropes.

Using Mosaic in a Garden

Posted: July 26th, 2010 | Author: hortoris | Filed under: Art, Projects | No Comments »

Mosaic garden decoration can be created by small pieces of colored glass, stone, pebbles as above or other materials. Small pieces, of different colors, known as tesserae are used to create a pattern or picture which can be incorporated into a number of garden features.

Mosaic Garden Features

  • Paths and focal points on walkways are often featured with a mosaic pattern.
  • A garden table can be topped by a mosaic. Work from the centre and draw a pattern of concentric circles. Use tile nippers to cut pieces of broken china to create a design, butter them with adhesive and stick on the table. Grout carefully after mixing with a grout colour.
  • House numbers can be created in a mosaic.
  • Mosaics make perfect outdoor pictures and sculptures. A glass mosaic will catch the light and add reflections and movement.
  • Mosaic tiles can be used to stand your pots on.
  • Put mosaic patterns on step risers, or use them in new and interesting positions..
  • How to make a mosaic birdhouse.

Get children involved with decorating plant pots and containers. Making mosaics can be fun for all ages.


Building a Dry Wall

Posted: July 25th, 2010 | Author: hortoris | Filed under: Projects | No Comments »

Do you admire the drystone walls of the dales or want a double skinned wall for more plants? Well here are some tips to help you create your own in the garden. True Dry Stone Walling is more complex but these tips are simple to follow and will help you create a useful garden feature.

Building Your Own Double Skinned Dry Wall

  • A dry wall is made with soil packed between the stones rather than mortar.
  • The best material is rough unhewn stone in blocks of varying sizes but your wall may be built with bricks or blocks instead.
  • When making a double faced wall dig out a trench 6″ deep that is wider and longer than the planned wall.
  • Put in a 3″ layer of clinker or small rubble as a foundation and firm it down.
  • Lay your first course of stones on the foundation then add a few inches of soil before adding the next course of stones.
  • Make sure this and sunsequent courses overlap  the gaps in the stones of the previous course.
  • Press the soil in at the sides and gaps as you fill the cavity.
  • Set each course so that the wall is slightly wider at the base than the top.
  • The centre is filled in as the work progresses.
  • Plants in the wall gaps should have roots that grow into the centre compost.

Tools to Use

  • A spirit level will help you with the foundations and keeping the top level.
  • Use a piece of string across the wall face as you work.
  • Trowel the soil into the gaps.
  • At the end of the walls you may want to cement in a post.
  • Use a hammer or mallet to tamp down the stones.

For plants in your new wall read


365+ A Lawnmower for Every Day

Posted: July 21st, 2010 | Author: hortoris | Filed under: Tools and Equipment | No Comments »

Stan Hardwick of Filey in Yorkshire has a collection of 365 Lawnmowers.
The Daily Mail dubbed Stan The Lawn Ranger.

Lawn Mower Clippings

  • Stan a retired greenkeeper  knows a thing or two about grass but 365 lawnmowers – wow!
  • To house the treasures he has a two story garden shed – now there is an idea, I never have enough room.
  • Stan’s oldest is an 1862 Penny Mower which still works and he describes it as ‘a brilliant machine’.
  • Makes in the collection include Ransome, Suffolk, and the £2,000 Follows and Baites Climax.

Have you heard the joke about my Lawn?  It’s  weedy.

I must have been smoking grass to put that in! Turf it out in the next edition (ed)

What do you call a cow who works for a gardener?  A lawn moo-er.


Garden Disinfectants and Cleaners

Posted: July 20th, 2010 | Author: hortoris | Filed under: Uncategorized | No Comments »

Some parts of the gardeners equipment need to be sterile to avoid passing on fungus and bacteria.

Thanks to the European community not mall disinfectants are approved for garden purposes but this is how I continue to work in the garden.

Disinfecting and Cleaning

  • Seed trays and plant pots are dunked in a solution of Jeyes fluid mixed with water in an old dustbin so I can do a batch at once.
  • Blades of tools like secateurs and loppers are not treated as often as they should be and I have been recommended to wipe over with Methylated spirits.
  • I am not going to use the ‘Which’ gardening advice of passing blades through a hot flame as it may take the edge off (but let me know if this works for you).
  • I use Path Clear in early spring and if the moss and algae is heavy I have used farmers milking parlour cleaner.
  • There is a citrus based disinfectant (Citrox) recommended for greenhouses that I will try this Autumn.

Liberon Garden Furniture Cleaner is ideal for cleaning old, tired and dirty wooden garden furniture and natural decking.

Honey fungus can not be treated with disinfectant and needs to be dug out and burned.

Path Cleaning and Cleaners
Garden Disinfectants
Best Weed Killers
Wood Care
Fence Care


Trellis and Plant Supports

Posted: July 20th, 2010 | Author: hortoris | Filed under: Products | 6 Comments »

I thought ‘Trellis’ was the name of Humphrey Lyttelton’s correspondent of North Wales.  Then I realised it could be a square or a diamond shaped growing frame. Imagine my surprise when I saw it could be both (square and diamond not a correspondent and a frame). Am I bamboo-ed or bamboozled.

One of Mrs Trellis’s faux pas was to refer to Humph as if he were another media presenter as this quote shows “Dear Mr Titchmarsh, never let them tell you that size isn’t important. My aunt told me that, but then all my new wallpaper fell off.”

Garden Trellis

  • Trellis is made from interwoven pieces of wood or bamboo that is often used to support climbing plants.
  • There are many types of trellis for different places and for different plants, such as sweet peas, grapevines, ivy, and climbing roses.
  • Concertina trellis will open up to form diamond shaped holes. Prefabricated trellis will be attached to uprights and cross members.
  • Trellis can also refer to the structure made from interwoven wood pieces  attached to the roof or exterior walls of a house.
  • Trellis could be made from metal.
  • DIY trellis can be made from a lattice of tanalised wooden strips about 1″ wide

Trellis Shapes

  • As trellis is now used as a decorative medium there are a variety of shapes and sizes available.
  • Square and rectangular panels can also have curved arch shaped tops.
  • Side panels may be used to surround an arbour.
  • The top of fencing can be sculpted with a trellis shape.

Read more on supporting your plants in Autumn
See the exciting new Logo Board game for Christmas 2011


Garden Spades, Shovels and other Spades

Posted: July 19th, 2010 | Author: hortoris | Filed under: Tools and Equipment | No Comments »

The right tool for the right job and when it comes to ‘calling a spade’ then you have a choice.

Popular Shovel Shapes

Shovels

  • A spade has a flat, sharp blade whilst a Shovel has curved sides or edges.
  • Shovels are useful for scooping up bulky material like compost or straw.
  • A spoon shovel is a long bar with a small oval blade at the end, for digging deep narrow holes.
  • Coal shovels, Grain shovels and Snow shovels speak for themselves.
  • Shovels tend to be larger and heavier than spades.
  • Trowels and scoops have curved sides but are smaller hand tools.

Spades

  • Probably one of my most used garden tools in borders and for planting shrubs and trees.
  • I have a stainless steel light ‘Ladies Spade’ for normal work.
  • My heavy duty forged spade will be used for heavier work and double digging new land.
  • I am not keen on modern innovations like E shaped heads, carbon fibre handles preferring a traditional spade with an ash handle.
  • Spear and Jackson are excellent spades and other brands include Draper, Fiskars, Bulldog, Yeoman, Faithfull, Silverline and own brands.

« Older Entries
Newer Entries »
  • Best of Gardeners Tips
  • Top 100 Gardeners
  • Gardening at Amazon.co.uk
  • Seeds at Thompson & Morgan
  • Jersey Plants Direct

Categories

  • Art
  • Books & Publications
  • Clothing
  • Constructions and Greenhouses
  • Garden Economics
  • Growing Aids
  • Pests and Problems
  • Products
  • Projects
  • Seeds and Plants
  • Tools and Equipment
  • Uncategorized
  • Weeds and Treatments
Gardeners Tips