Gardening Products

Tips for the Gardener

Shop Around for Greenhouses

Posted: March 15th, 2011 | Author: hortoris | Filed under: Constructions and Greenhouses | No Comments »

022

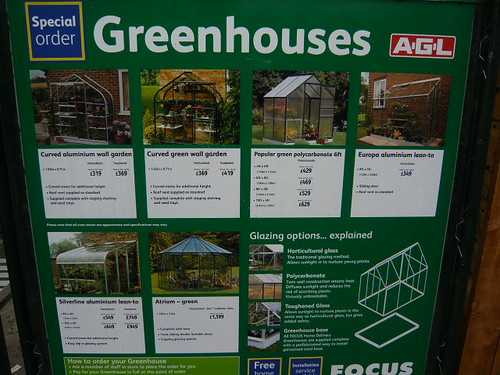
Greenhouses are available from a widening range of suppliers and we encourage you to shop around.

Buying Factors

  • Appropriateness for your garden or allotment is key.
  • Size, safety and ease of installation are the first factors to bear in mind.
  • The desired longevity of your greenhouse will influence the construction and maintenance.
  • Aluminium is cheaper than wood and glass is better than polycarbon.
  • Access for you plus light and ventilation are important. A window and or louvers are needed.
  • Extra equipment such as benches shelves and staging can be added later.
  • Flooring or growing direct into the soil needs to be considered.


Cost has not been mentioned in the above list. Try to get what you need and want within or close to your budget. Quality will out and you generally get what you pay for.


Greenhouse Vendors

  • Specialist companies like Halls, Robinsons and Gabriel Ash
  • Retail warehouses like Focus and  B&Q
  • Garden centre chains like Wyvale
  • Retailers like Tesco and Argos
  • Amazon range is limited

Preformed Pond Shapes

Posted: February 25th, 2011 | Author: hortoris | Filed under: Projects, Uncategorized | 1 Comment »

Pond

Ponds come in many shapes and sizes, I particularly like the kidney shaped version of this preformed rubberised plastic.
Cheaper versions are now on the market made from blown plastic that is not as rigid but is suitable for smaller preformed shapes.
Of course if you want a bespoke shape you can use Butyl liners, fiberglass, concrete or even clay.

Tips For Installing Ponds

  • Avoid sharp edges and stones by lining the base of the hole with sand.
  • Beware the weight of water will push a preformed pond deeper so make sure the base is firm and well packed.
  • Ensure the pond is level as the water will highlight any errors, slopping over one side and leaving a gap at the other.
  • Make a beach area at the edge of the pond so wild life can access the water without needing to jump off the rim or edge.

Tips from Wildwoods

Read the rest of this entry »


Bird Boxes and Nesting

Posted: February 10th, 2011 | Author: hortoris | Filed under: Projects | No Comments »

Bird box

Now is a good time to add to the bird boxes in your garden.

  • An open box has most of the front missing to attract Robins, Pied Wagtails, and Redstarts. Place 5′ or higher and close to a hedge.
  • With a box containing a small circular hole cut in the front it is the size of the hole that determines which bird is most likely to take up residence.

25 -28 mm for Blue Tits and Great Tits
32 mm for House Sparrows
45 mm for Starlings

  • I have a ‘Roosting pocket’ are made from natural materials (coconut fibre), to provide a place for birds, particularly wrens, to shelter.
  • The nesting boxes and  pockets are best placed in a quiet, sheltered spot – away from direct sunlight and prevailing winds and rain.
  • Owl boxes need to be over 15 feet high like the photograph.
  • Hung on a north facing wall or in a shady tree the box will remain cool as the weather warms in the spring.
  • It seems obvious to put boxes out of reach of any predators, particularly cats.
  • Position boxes away from bird feeders as the nesting pair will be constantly chasing the feeding birds away from their territory!
  • If building your own box use untreated wood.

Fish for Ponds

Posted: February 9th, 2011 | Author: hortoris | Filed under: Projects | 2 Comments »

Burnby Hall Pocklington

I am again thinking of adding another pond to my garden. It will be a feature in a new Japanese themed garden area so will need some coloured Koi. The two most commonly kept fish types in garden ponds are Goldfish and Koi but I have previously kept Orfe.

Koi

  • Koi   like to eat plants and can be kept  with only a few  types of plants.
  • Koi grow larger than Goldfish and should not be kept in ponds smaller than 700 gallons. Their pond should be at least three feet deep.
  • Koi live in communities so you should have at least 3 fish
  • Never use chlorinated water with Koi.
  • Koi  are very hardy fish and can withstand very low temperatures as long as the water is not frozen solid.
  • Koi are peaceful fish and can live with goldfish.

Goldfish

  • Goldfish can stay in your pond during the winter but need at least 12-16 inches of water below the freeze zone to survive.
  • Goldfish can be kept with most aquatic plant species.
  • They are the best fish for a small pond and can be kept indoors through winter if desired.
  • Goldfish types such as Shubunkins are low maintenance, colorful and rewarding as long as they get enough oxygen.

Orfe

  • Orfe are good fish as they swim visibly near the top of a pond
  • Orfe are sociable fish and should always be kept in groups of at least three.
  • Orfe are fast swimmers and need a lot of oxygen.
  • Orfe will jump out of very small ponds unless they get lots of room.

You may be commenting that I need to control the algea in the picture. I could have used a bale of barley straw or a chemical control from amazon

Read Preformed Garden Ponds

link to Garden Fish Pond site


Ready Made Water Features

Posted: January 26th, 2011 | Author: hortoris | Filed under: Projects | No Comments »

fountain

I saw this water feature at our local garden centre. It appealed as it was ready to go into the garden and did not seem to need much effort from me.
It seemed to be easy to clean and an appropriate size for a small corner.
The evaporation will be less than with a spray fountain yet there will still be the gurgle and movement of a small stream.
This type of feature is very popular for conservatories as a method of maintaining humidity levels.

If you are good at DIY then ‘Outdoor Water Features: 16 Easy-To-Build Projects for Your Yard and Garden’ may be the book for you.

Book Cover


Best Bird Baths and Tips

Posted: December 26th, 2010 | Author: tejvan | Filed under: Projects, Seeds and Plants | 7 Comments »

birdbath

photo by Wilip Von Ree

Birds are struggling through our cold winters in the USA and the UK. Soon they will be hatching and fledging so they need access to water and the gardeners answer is a bird bath.

Where to Locate a bird Bath

  • Birds will use a bird bath if they feel safe and have an escape route into cover.
  • Locate the bath near suitable hedges or trees
  • Make it hard for cats to lurk near the bath using vegetation as cover
  • Place the birdbath where the birds can see the area around it and where there are no hiding places for predators
  • Place away from direct sun as this prevents algae growth in the bath.

What Features are Needed Read the rest of this entry »


Good Gardening Website Guide

Posted: November 15th, 2010 | Author: hortoris | Filed under: Projects | No Comments »

We are biased with this first selection as our sister site offers tips for top gardeners on a wide range of garden matters. Check out the 20 categories where old post are filed such as the House Plant selection. Alternatively search for the plant, or gardeners tip you are looking for amongst the 1500 pages in the archive.

‘Royal Horticultural Society’ (RHS) says it in the name and the web site has truly regal pretensions. The public can access a wealth of information and databases but may be encouraged to become a member of the society to get even more benefits.

Garden.com is a humongous retailing site for all that are garden products. Use it to check what is on the market then shop around for a local supplier. As with most sites if you are lost click on the name or logo to go home.

The National Gardens scheme is a national institution with its comprehensive list of gardens open to the public for charity. An NGS garden will have had strict quality control and you are likely to find a location on the site that you can’t wait to visit in person.

Specialist and enthusiast create some great sites with founts of knowledge and good photography. You wont go far wrong with the Alpine Garden Society

A magazine magazine on the web can be found on Gardeners World. a spin off from the BBC TV programme and monthly magazine of the same name. If you want a virtual magazine this is the site for you

For those who what to Garden Organic then the old HDRA site is now spruce vibrant. I am not sure what Henry Doubleday would make if it but have a look for yourself.


Plant Labels, Markers and Tags – DIY

Posted: August 3rd, 2010 | Author: hortoris | Filed under: Projects, Uncategorized | 1 Comment »

plant label brick

Do you ever think you have ‘dropped a brick’ when you can’t remember the name of one of your plants?
Do you yearn for something other than a small plastic tag with a pencil markings you need to be a contortionist to read?
Perhaps you reuse the colourful nursery plant labels that are bleached by the sun in one season?

Well pictured here are 3 home made methods of visually recording your prized plants.

Plant lables

This bed is edged with old slates and other slates for name tags are painted white. The size was 2.5″ by 6″ and the short edge was capable of being wedged into the soil. I would need to practice my script writing to get the feel of this old style naming but the effect was in-keeping with this bed of plants.

plant lables

Do not be fooled by the shape of these labels. As they say ‘a good big one beats a good small one any-day’. And these name tags were big as the Jardiniere was over 2′ tall so the name sticks were 3 feet plus. Not so obtrusive when well sunk into the garden but still visible without a microscope.

My favourite was the white brick (with the flat side). Other alternatives include engraved stones as labels, wooden tags and labels or aluminium diy labels from suppliers like Alitags.
The RHS has a web page of children’s projects to make fun labels, you just need a plant called ‘Blue Peter’


Using Mosaic in a Garden

Posted: July 26th, 2010 | Author: hortoris | Filed under: Art, Projects | No Comments »

Mosaic garden decoration can be created by small pieces of colored glass, stone, pebbles as above or other materials. Small pieces, of different colors, known as tesserae are used to create a pattern or picture which can be incorporated into a number of garden features.

Mosaic Garden Features

  • Paths and focal points on walkways are often featured with a mosaic pattern.
  • A garden table can be topped by a mosaic. Work from the centre and draw a pattern of concentric circles. Use tile nippers to cut pieces of broken china to create a design, butter them with adhesive and stick on the table. Grout carefully after mixing with a grout colour.
  • House numbers can be created in a mosaic.
  • Mosaics make perfect outdoor pictures and sculptures. A glass mosaic will catch the light and add reflections and movement.
  • Mosaic tiles can be used to stand your pots on.
  • Put mosaic patterns on step risers, or use them in new and interesting positions..
  • How to make a mosaic birdhouse.

Get children involved with decorating plant pots and containers. Making mosaics can be fun for all ages.


Building a Dry Wall

Posted: July 25th, 2010 | Author: hortoris | Filed under: Projects | No Comments »

Do you admire the drystone walls of the dales or want a double skinned wall for more plants? Well here are some tips to help you create your own in the garden. True Dry Stone Walling is more complex but these tips are simple to follow and will help you create a useful garden feature.

Building Your Own Double Skinned Dry Wall

  • A dry wall is made with soil packed between the stones rather than mortar.
  • The best material is rough unhewn stone in blocks of varying sizes but your wall may be built with bricks or blocks instead.
  • When making a double faced wall dig out a trench 6″ deep that is wider and longer than the planned wall.
  • Put in a 3″ layer of clinker or small rubble as a foundation and firm it down.
  • Lay your first course of stones on the foundation then add a few inches of soil before adding the next course of stones.
  • Make sure this and sunsequent courses overlap  the gaps in the stones of the previous course.
  • Press the soil in at the sides and gaps as you fill the cavity.
  • Set each course so that the wall is slightly wider at the base than the top.
  • The centre is filled in as the work progresses.
  • Plants in the wall gaps should have roots that grow into the centre compost.

Tools to Use

  • A spirit level will help you with the foundations and keeping the top level.
  • Use a piece of string across the wall face as you work.
  • Trowel the soil into the gaps.
  • At the end of the walls you may want to cement in a post.
  • Use a hammer or mallet to tamp down the stones.

For plants in your new wall read


« Older Entries
Newer Entries »
  • Best of Gardeners Tips
  • Top 100 Gardeners
  • Gardening at Amazon.co.uk
  • Seeds at Thompson & Morgan
  • Jersey Plants Direct

Categories

  • Art
  • Books & Publications
  • Clothing
  • Constructions and Greenhouses
  • Garden Economics
  • Growing Aids
  • Pests and Problems
  • Products
  • Projects
  • Seeds and Plants
  • Tools and Equipment
  • Uncategorized
  • Weeds and Treatments
Gardeners Tips